Finding Direction Without a Compass
Sun, stars, a wristwatch and a few trees — how to find north when the compass stayed at home.
You are lost. I mean really lost — standing in the middle of nowhere with no idea which way to go. First, stay calm and think rationally: you can survive a long time without food, but you need water, and panic burns both. This page is not about extreme survival; it deals with one specific problem — finding your way with nothing but the sun, the stars and the ground under your feet.
The methods below are written for the northern hemisphere, north of 23.5°N. They work in the southern hemisphere too, but in some places you have to swap north and south to get it right.
Before you start walking
Climb a hill if you can and take a good look around — for a road, a fence, a roof, any trace of human activity. If you see nothing, decide which direction is worth travelling before you set off. If you have no map, sketch the terrain in front of you and mark north on it with one of the methods below. If you do have a map, work out where you are first.
Do not climb more hills than you have to, and never climb when you are exhausted. In that case, staying put and making yourself easy to find may be the better decision.
Method 1 — The shadow stick (the most accurate)
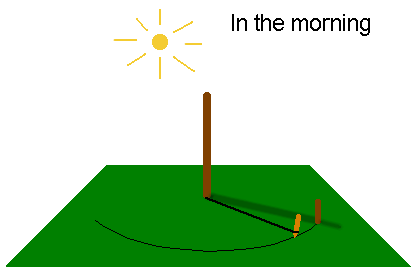
This method needs a clear sky and plenty of daylight, but no equipment beyond what you can pick up: a straight pole about 1 m long, two small sticks or stones, one stick with a sharp point, and something that works as a string.
- Push the pole upright into level, horizontal ground, in the morning and well before noon.
- Put a small stick in the ground exactly where the tip of the shadow falls.
- Tie the string to the base of the pole and the sharp stick to the other end, so that the string reaches the small stick when stretched. Scratch a half circle in the soil with the sharp stick.
- Wait. The shadow gets shorter and shorter until noon, then grows again. At noon, when it is at its shortest, the shadow points north — it is hard to catch the exact moment, but it is worth marking.
- When the shadow reaches your circle again in the afternoon, mark that spot with the second small stick.
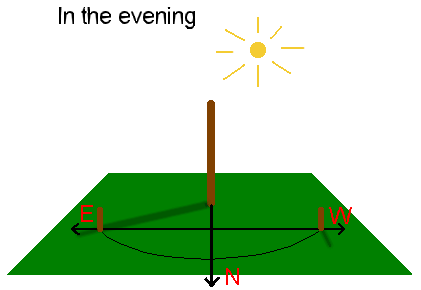
The line between the two marks runs west–east; north is at right angles to it, on the side the noon shadow pointed to. On a partly cloudy day, mark the shadow at several moments during the day: any two marks that lie at the same distance from the pole give you the same west–east line, and you will not lose the whole day to one cloud.
No string? Use a second pole cut to the right length, or any improvised equivalent. What matters is that what you draw is a real circle around the pole.
Method 2 — The quick shadow line (20 minutes)
There is a fast version of the same idea that is accurate enough for most purposes: place one stick at the tip of the shadow, wait about 20 minutes, then place a second stick at the new tip. The line between the two sticks is roughly west–east. It is only approximate, and it gets less accurate the further you are from the equator, but it costs you almost nothing.
Method 3 — The stars
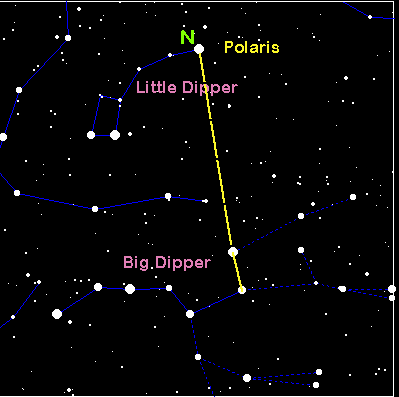
At night you can navigate by the stars, though walking in the dark is slow: it is easy to stumble, easy to lose sight of the sky between trees, and easy to end up walking in circles.
In the northern hemisphere one star sits almost exactly north all year, Polaris. Find the Big Dipper (the Plough), take the two stars at the end of its bowl, and extend that line upward by five times the distance between them. That is Polaris, and that way is north.
In the southern hemisphere you need the Southern Cross instead: the long axis of the cross, extended about four and a half times its length, marks south. Ask someone to point it out to you before you need it.
Method 4 — An analog wristwatch
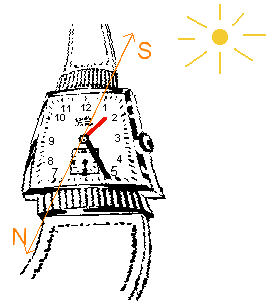
With a watch that has hands, hold it flat and point the hour hand at the sun. Then bisect the angle between the hour hand and the 12 o'clock mark — before 6 a.m. and after 6 p.m., bisect towards the nearer side. That bisecting line points south, so north is directly opposite.
The reason for halving the angle is simply that the hour hand goes round twice while the sun goes round once. If you wear a digital watch, draw a dial on paper and mark the current hour on it; the rest of the method is identical. This also works in thin fog: if you can see any shadow at all, a straw or a thin stick will find it, and the shadow points away from the sun.
Method 5 — A needle and a glass of water
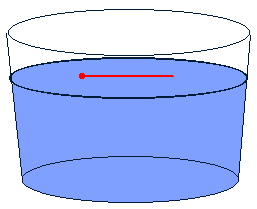
A needle will float on the surface tension of water if you lay it down gently, and if it is magnetic it will swing into the north–south line like any compass needle. Patience is the whole trick: float the needle on a small piece of paper, which will sink and leave the needle behind, grease it lightly with something that is not water based, or lower it with a fork.
Two problems remain. You cannot tell which end is north, so check with one of the other methods. And not many needles today are magnetic at all — if yours is not, the method fails. For the theory, see Creating Your Own Compass.
Method 6 — Natural signs
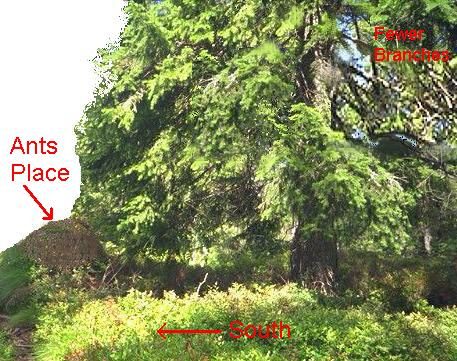
With no shadow at all, there are a few natural signs worth reading, though only the ones I have checked myself are listed here.
- Branches. A tree usually carries fewer branches on its north side — easiest to see if you look up along the trunk.
- Moss and lichen. The north face of a trunk and of a rock stays damper, and most species of lichen and moss prefer it.
- Ant nests. Ants tend to build on the warmer south side of a tree.
- Snow. In the mountains in spring, snow melts first on south-facing rock and south-facing slopes.
- Vegetation. Undergrowth is usually thicker and fruit ripens earlier on south-facing slopes.
These signs are not very reliable. Prevailing winds can change the average shape of trees significantly, and a single sign can easily point you the wrong way. Use as many signs as you can, and only draw a conclusion when they agree.
The simplest answer
Every method above is a workaround for one small object that weighs almost nothing. A baseplate compass in a pocket, or a lensatic compass in a pouch, settles the question in two seconds — see our compass range or ask us for a bulk quotation.